Presentation Brace/Toolbox Handle

I have this recurring dream.

   The dream is a traveling tool kit with the smallest cabinetmaker's tools in it that will still do a full sized job.

 I wanted a brace in the box but braces take up so much room that it really seemed better to keep it outside the box somehow. I got this idea that if the head could come off and a plain shank was clamped into the chuck I could clamp it into some brackets and it would become the carrying handle for the box itself.  I don't expect to be needing a 16" swing brace for the work I'm planning with the "Cabinet Doctor's" box. Mostly it will be for drilling small holes and driving screws. So I made my brace with a 5' swing. This is actually nominal and 5" is an exaggeration, but it's more than 4 so...... 

This project started with nothing but an idea and rusty, crusty old boneyard scrap to work with.

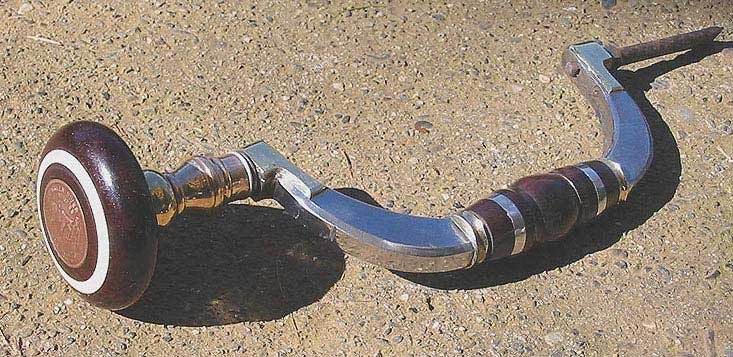
  The frame began it's life as a piece of 1/2" thick plate steel, a torch and a plan.  There were brass spindles and old lamp parts used. The brass plates at the ends of the frame had to be pressed to shape being too thick to merely bend by hand. This turned out to be a job for a hardwood punch n die outfit I  made up.

The rings are in the center rosewood handle are pewter, cast in place,  and they're fun to make.

Here's how. Get comfortable.
  Pick yourself out a nice piece of handle stock. It has to be a little wider than you need in the end but only a little longer or thicker so a small piece will do. Rosewood, cocobolo, something quilted, curly or bright colored, ya don't need much.
  Mark the 2 wider faces with some squiggly lines so you can put it back together the same way it was when you found it. Now mark the center all the way around and carefully cut to the line opening it up. You want them to fit back together as smoothly as you can, so plane and scrape until they snuggle nicely.
Shoot a new line up the centers that you've just exposed and cleaned. Measure the diameter where it will go and add 1/32nd inch. You want to saw a line 1/2 that depth up the center of each 1/2. Mark the diameter on the ends and take a gouge and rasp to remove it. You should now have a hole when the 2 halves are together. If you have the proper sized reamer you can leave the hole just undersized instead, clamp them together temporarily and ream the hole. This is a more elegant solution, but not totally necessary.
  Ok, now it's time to glue up. Slather one side with a very thin coat of glue, lay on a piece of typing or newspaper. Put a thin coat on the other side and clamp up, minding the hole lineup.
  I use 2 short pieces of dowel to turn on. Maybe an inch long each. It's likely you'll have to custom size them to fit the hole a bit. You want to center drill the dowels for your lathe centers, so pay careful attention if you don't have a self centering 3 jaw chuck. The dowel stubs must be genuinely glued in to each end of the hole. They'd spin and you couldn't turn if they weren't. So, glue them in ( break away the paper at each end) leaving about 3/8" (more or less) of dowel sticking out each end.
  Now it's just a matter of taking a light cut with the lathe chisel until you get your shape. You don't get to just stick it in and hog the chips on this job. The glued paper will hold, but not under too much stress. Take my word for it. Your carefully prepared pieces exploding and flying across the
room are not a welcome sight! You can do a straight cylinder of any shape that appeals to you.  The grooves for the rings are nothing more than a parting tool carefully eased in at each end to a bit less than 1/4" deep.
  Opening the thing up is easy. But first re-establish a light pencil squiggle so you'll remember which way they go back together.  Use a chisel to split the dowel stubs right up the middle. The paper will part for you right up the middle too. Then carve out the dowel stubs and gingerly scrape away the paper and glue from each half. The part you want to pay attention to is the very outside edges as this is the part that will show.
  Got it clean enough? Glue it up! As long as you wipe down with acetone,
your regular favorite wood glue is just fine for rosewood. Set the 2 halves together around the frame and rubber bad, tape, bungee cord?? Anyway, light clamping pressure will do you.
  Finally the rings!!
Pewter is available all over the place. If you have to you can always buy some. Old dented sugar bowls and such are cheaper though.
  Like any metal, it shrinks a bit when it cools. I wrap 3 layers of masking tape on each side of the groove to start to allow for shrinkage. Then lightly grease a piece of clothesline cord and wrap it right into the groove. Pull off some more masking tape (ordinary paper painters tape) and wrap around over the cord leaving about 3/8" or whatever the cord will let you. Lay on another layer
and then another. You want it thick enough not to collapse.
 Yank out the cord. Well, ok, gently work it out. Now you know why you greased it 8^)
  Last trick is to dust in just a bit of talcum powder or powdered graphite. Lets the metal flow better.
  My glorious pewter melting and pouring outfit is a 1 burner camp stove and a tomato sauce can with a pour lip formed in the rim. Figure out something to pick up the hot can with in advance. I have 2 sticks and piece of wire, so anything will work for a handle. You got to have something though.
  Heat up the pewter until it melts and sloshes easy. Ease your pour lip over one side of the opening and pour away. Like magic it appears on the far side. Wait a short moment and fill in the hole you poured through.
  That's it (finally). Take a file and clean it up and there you have it!

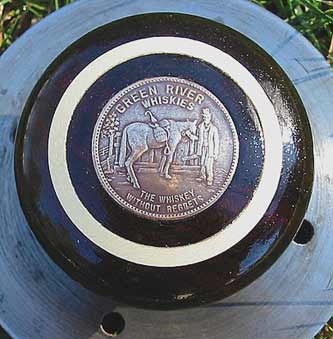
Here is a closeup of the brace head. Being as the ultimatums use a struck coin medallion I thought it'd be fun to have one too. I found this old trade token from the early 1900's.  (If you owned a distillery, would you call -your product- Green River Whiskey?)

 Another simple punch and die was made up and lined with rubber this time ,to make sure not to damage the embossing, and the dome shape was gently pressed in using a steel benchvise as the press. 

 The rosewood pad was turned on a faceplate first. Then the holly ring. You mount the inlay ring, in this case hollywood, to the faceplate with double stick tape and use a light touch and calipers often to size it just right.  Then both parts must be sealed with several coats of shellac BEFORE  trying to assemble them. If you don't, glue or any further finish will bleed the red rosewood color into the holly like you can't believe!   

  Stop back at this page again sometime and I might have the pix of the toolbox brackets up.

  yours, Scott